When last we talked, I had gone to the lumber yard and acquired -- of all things -- lumber for to make the cabinets. I spent a while measuring and cutting the pieces....
Then spent more time joining (using the pocket jig), planing, and sanding....
And then we didn't take any pictures for a while.... but when I remembered to get the camera, there it was! A big ole cabinet!
I didn't do the doors -- I'm not set up for all that faincy curvy stuff -- but it's done and the client likes it.
Showing posts with label Bob the Builder. Show all posts
21 June 2012
18 June 2012
...And A Half Step Back
So, going to the lumber yard at 8:00 turned out to be going at 9:30, and then there was some last minute changing of plans, so this is what I'm now going to build:
I realized I didn't ask if they wanted the double cabinet on the left or the right and, of course, I had Sketched it backwards (no big deal, a single click reversed the thing). But he didn't like the idea of the cabinets being one depth with the microwave shelf extending, so instead of a single 12" board for the depth of the cabs, there's now 2 joined 8" boards. And no face frames, which is mainly an aesthetic thing anyway when building with solid wood. And since the micro shelf is the same depth as the cabs now, I figured for overall strength it was best to have the top go all the way across the piece.
The doors, btw, are "store boughten", and established the sizes for all the rest.
I've got about half of the cuts done and will soon be able to start making wide boards out of narrow boards. Pocket screws, glue and clamp time ahead!
One Step Closer
The new houses all have a large kitchen island with a sink, but in true Tico fashion, there are no other counters or cabinets. So, the landlord asked me if I would build a wall cabinet unit for storage and also to provide a place for a microwave oven. We're going to get the materials in a little bit, but before doing that I had to figure out just what I needed.
Enter "Google Sketchup" and "Cutlist Plus". The former for the design, and the latter to tell me how many boards, and how they can most efficiently be cut. Those with carpentry/cabinetry experience know how wonderful it is to have a program to figure this out for you. :)
So. Wall cabinet design (with and without doors, and in metric for the ease of understanding for the client):
The cut list program doesn't easily avail itself of screenshots, but here's some clips showing the generated lists:
This tells me I need (2) 1"x12"s for the main shelves and sides, and where they need to be cut:
This shows the (5) 1"x2"s for the face frames, all marked for cutting:
And this one depicts the (1) 1"x8" for making the microwave section:
I won't be using it, the but program will even print out labels for the individual pieces of lumber, so they can be loaded in order (handy for larger projects, I'm sure).
Now it's just time for coffee before going to the lumber yard....
15 June 2012
Getting Jiggy With It
Hello, strangers!!! Yes, I know it's been months since I've posted anything, but... that's life these days.
On to the reason I've revived this beast....
I shall be building some cabinets (both for ourselves, in the new house our landlord is building, and for him to put in the other two new houses he's building) and hope to continue building things for money and all that, and ... anyway, I got a new toy. It's called a Pocket Screw Jig, and it's used for building frames (cabinet fronts and doors, pictures, &etc.) fast and with a clean front (no nails/screws/dowel pins visible).
So easy to use, just position the jig, clamp it down and drill (using the specialty "step bit" that comes with the jig). You then insert screws in the resulting pockets (hence the whole "Pocket Screw" thang), tighten them down, et viola!!! A clean, tight corner.
There's only one small problem. The whole thing is designed to use pan head screws, which are readily available in The States, but seem to be ... not so much available here in Costa Rica. I haven't checked with the big box hardware store EPA, but I did go to the three medium-sized places here in San Rafael, and they'd never seen such a thing. You can see here what happens when one uses regular wood screws....
I know I can order the screws through the same place where I got the jig (Grainger Hardware Supply, which recently opened a Costa Rican location), but those would have the a) added cost of shipping from The States, b) the whole "2-3 weeks to get them in" thing, and c) they're square drive [the 'slot' in the screw head is square shaped, rather than the common Phillips or Flat], which would require a specialty screw bit/driver.
More types of screw head than you ever knew existed:
But I'll get it figgered out.
01 January 2012
On a (Building) Tear
For Christmas this year, Jen's folks gave us cash, with which to do nice things for ourselves. Jen used her bit as a lion's portion of the price of a "like new" netbook computer, and I decided I would use mine to buy materials for a larger computer desk, as the one I built when I first arrived in Costa Rica is small, because I had a small space in which to put it.
The first step was to go to the neighborhood lumber yard and get some planking for the top. I wanted to go as wide as possible (and here in CR it's easier to get really wide boards), but I ended up getting 1"x10"s, as they were the most reasonably priced. I also went with pine, although I did think about using the laurel (accent on second syllable, please) like I used for the folding tables last time.
I already had some 2"x3"s, that Jen's former boss gave me (along with some other lumber) when they closed down shop, so I decided to use them for the under-top frame and legs.
Not a whole lot left to do before bringing this one into the house... decide final placement of the shelf for the CPU, more poly on the top (and legs and shelf) and attaching the upper shelf unit that is on the old desk, but all that will have to wait until I return from my quarterly trip across the border to get my visa re-stamped. I leave in the morning, and will return on Thursday.
Pictures to follow!
The first step was to go to the neighborhood lumber yard and get some planking for the top. I wanted to go as wide as possible (and here in CR it's easier to get really wide boards), but I ended up getting 1"x10"s, as they were the most reasonably priced. I also went with pine, although I did think about using the laurel (accent on second syllable, please) like I used for the folding tables last time.
I already had some 2"x3"s, that Jen's former boss gave me (along with some other lumber) when they closed down shop, so I decided to use them for the under-top frame and legs.
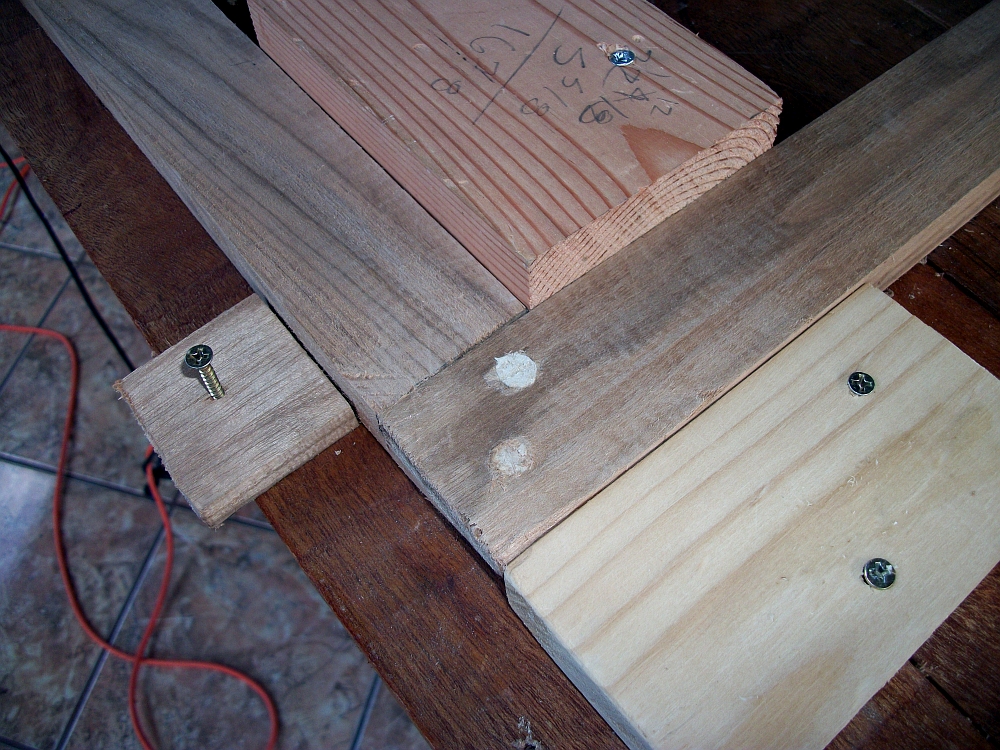
| Top planks 'joined' using cleats and screws, and under-top frame assembled and temporarily in place. |
| Legs and low back brace added, pondering computer shelf placement. |
| Same thing, viewed from the other end (note the 'park' bench I made in the background). |
| The top with a nice coat of poly on it. |
| Close shot of the wet-polyed top, showing the dowel peg anchors. |
Pictures to follow!
27 December 2011
Buildering Stuff
I decided to make some folding TV tables, now that I have all the tools. I began by looking online for free plans, but the hundreds of "leads" all led to the same page, which was just written instructions which were difficult to follow. So, of course, I just started making....
| After cutting a rabbet for the top pieces to lay into, I put the frame pieces together with glue and brads and had this. |
| And then the inner legs, with braces and ½" dowel hinge pins (and a stop board I had to add so the legs wouldn't splay all the way to the top frame). |
| And VIOLA!!! One folding TV tray. |
| I
still have to put a finish on it (polyurethane varnish), and build
another one, but at least I finished this much by Christmas morning for
an 'official' unveiling. The End. |
03 April 2011
Today in Building Stuff
So Jen's had this futon couch for almost 15 years, and over the last few months (exacerbated, no doubt, by almost-a-teen angst-flopping) it has been getting pretty creaky. Today was the day to fix it:
The supports, they are missing.
Cushion moved to table, and cat content, off to the lumber yard I betook meself.
Got the needed dimensional lumber, made some cuts....
Pondered some....
Assembled some....
A usable couch, and the first part of building a Brand New Couch is done. For what ever time we decide we want a Brand New Couch.
| Not good. |
| "Wait. What?" We managed to move the cushion without moving the cat. |
| Rule is: Measure Twice, Cut Once |
| A bit of analog cipherin' to figger spacing... |
| Some screws, and it's ready for cushion! |
| Ta Da! |
A usable couch, and the first part of building a Brand New Couch is done. For what ever time we decide we want a Brand New Couch.
17 March 2011
Time To Shelf It
My current makin'-sumpin' is a small shelfy thing for on to put my computer tower (with our UPS under, and then my external disc drive on top). After some measurement problems, I got this done.
Photos taken after dark, better ones tomorrow:
(and, yes, that is a pile of onions in the background of the second photo)
Photos taken after dark, better ones tomorrow:
(and, yes, that is a pile of onions in the background of the second photo)
15 January 2011
Framed!
As mentioned earlier, I'm working on a rolling board, as all our counters are tile with 1/8"+ grout seams, which, if I wanted a large waffle design on my biscuits and such would be fine. Since I don't though, I make this:
And now I think I'll go make some cinnamon bread.
| Here's the four pieces of the frame laid out after cutting. Not bad for doing it without clamps and such. (Also shows the dining table which was out in the "shop" for a couple new coats of poly) |
| Closeup of the above, showing ... it closer. (also note my carpenter's calculator at top :) ) |
| And here's the thing on the counter, waiting for me to use it (the plywood top is poly'ed, but not stained). Pretty, eh? |
And now I think I'll go make some cinnamon bread.
12 January 2011
Half a Lap Is Better Than No Lap &etc....
So what has Bob the Builder been up to since finishing the bunks, you might ask. If you did, then here's the answer -- with PICTURES!!
(and if you din't, then why are you reading this? Huh?)
![]() |
| Okay, I didn't do this, but I took the picture: Looking north from the front door (and across the neighbors privacy wall) |
| ...and looking west. |
| Then I knocked together a "Tater Bin" -- happy coincidence was that I didn't have to do any cuts at all, these pieces were all cutoffs and ends from the bunk bed |
| Tater Bin (showing workbench -- which I think is so pretty... shame it's gonna get all beat up as I continue using it, but that 's the nature/purpose/ "raisin deeter" of a workbench |
| What you see is what I've got -- no clamps yet -- so I've rigged some blocks to hold the pieces as I cut the laps. Then I'll move the blocks around to use as a "frame holder" as I do the assembly. |
| My "workshop", showing the one power tool - a non-reversible drill. |
01 January 2011
31 December 2010
On The Sixth Day of Christmas....
We (and it's we now because Jen has been doing most of the painting) finished [basically] the bunk beds!
Since my last posting, this has happened:
| After removing the old bunks, Raxi helped us carry in the new pieces |
| I had decided to reuse the old side rails and slats, so we had to line up and drill holes for those bolts |
| once the bottom was in place we brought in the top |
| 18 majillion bolts later, it was all together! |
| And now it's mostly painted! |
Subscribe to:
Posts (Atom)


